Utah is a natural theme park carved by time red rock cathedrals, glowing slot canyons, alpine cirques, and hoodoos stacked like chess pieces.
Whether you’re lacing up for a family-friendly stroll or a bucket-list traverse with airy drop-offs, the Beehive State delivers in every season.
This guide spotlights twelve of the most beautiful hiking trails in Utah, curated to showcase the state’s wild variety from famous national parks to quieter desert canyons and Wasatch alpine gems.
In this ultimate guide, you’ll find:
- At-a-glance “Trail Snapshot” boxes (distance, elevation, difficulty, time, trailhead).
- Why each trail is special (landscapes, geology, seasons).
- Step-by-step trail notes and safety considerations.
- Photo tips and the best light.
- Practical planning: where to base yourself, when to go, permits, crowds, weather.
- A minimalist packing list and pro tips to hike smarter.
- A 5-day sample Utah hiking itinerary for first-timers.
- Responsible hiking reminders (Leave No Trace, desert travel etiquette).
Quick note: Conditions, fees, and access can change—especially on high-demand routes and in slot canyons. Always check the latest official guidance before you go.
When Is the Best Time to Hike in Utah?
Spring (March–May): Blooming desert, cooler temps, snow lingering in the alpine. Expect big temperature swings. Streams can run higher with snowmelt.
Summer (June–August): Early starts are essential in the desert (heat and monsoon storm risk). High-country trails finally melt out; alpine wildflowers peak mid- to late-summer.
Fall (September–November): Gold in the aspens up north; crisp mornings and dreamy light. Desert temps are ideal. It’s a sweet spot for photos and mileage.
Winter (December–February): Quiet parks and magical snow-dusted red rock. Some trails become icy; traction helps. In the Wasatch, many hikes become snowshoes or ski tours.
Map Overview (How to Group These Hikes)
For logistics, cluster hikes by region:
- Zion National Park area: Angels Landing, The Narrows (Bottom-Up), Canyon Overlook, Observation Point (via East Mesa).
- Bryce Canyon area: Navajo Loop + Queen’s Garden, Fairyland Loop.
- Escalante / Grand Staircase area: Lower Calf Creek Falls, Peek-a-Boo & Spooky Slot Canyons.
- Moab / Arches & Canyonlands area: Delicate Arch, Devils Garden Loop, Corona Arch.
- Wasatch Range (near Salt Lake): Lake Blanche, Mount Timpanogos (add one alpine wildcard—see “Alternates” later).
Choose one or two hubs (Springdale for Zion, Tropic or Bryce for Bryce, Escalante for GSENM, Moab for Arches/Canyonlands, and Salt Lake or Provo for Wasatch).
The 12 Most Beautiful Hiking Trails in Utah
Difficulty ratings are general guidance for prepared hikers in fair weather. Always tailor to your fitness, experience, and conditions.
1) Angels Landing (Zion National Park)

Trail Snapshot
- Distance: ~5.4 miles out-and-back
- Elevation Gain: ~1,500 ft
- Difficulty: Strenuous; exposure on chains section
- Time: 3–5 hours
- Trailhead: The Grotto (Zion Canyon shuttle, in season)
- Permit/Logistics: High demand and exposure; check current access rules and any permit/lottery requirements well in advance.
Why It’s Beautiful
Angels Landing is the spine of Zion Canyon, a narrow fin of Navajo sandstone with soaring vistas on both sides. The chain-assisted scramble to the summit is as dramatic as hiking gets, with the Virgin River carving a green ribbon far below.
Trail Notes
Switchbacks (Walters Wiggles) lift you to Scout Lookout, where the exposure begins. From here, the final half-mile follows an airy ridge with chains. Footing is mostly solid sandstone; allow time for two-way traffic at bottlenecks.
Photo Tips
- Golden hour: Early morning softens the canyon’s layers; late day glows red/orange.
- Composition: Use hikers on the ridge for scale; wide-angle lens helps.
Pro Tips
- Not advised for those with severe vertigo.
- Start early; carry plenty of water; wear grippy shoes.
- Have a plan B in case permits or weather don’t align (e.g., Observation Point via East Mesa).
2) The Narrows (Bottom-Up, Zion National Park)

Trail Snapshot
- Distance: Choose your turnaround (up to ~9.4 miles round-trip to Big Springs)
- Elevation Gain: Minimal but walking in water is strenuous
- Difficulty: Moderate to strenuous depending on depth/flow/temp
- Time: 3–8 hours
- Trailhead: Temple of Sinawava (Riverside Walk to river entry)
- Permits: Bottom-up day hikes typically do not require a permit; always confirm current rules. Top-down does require one. Weather/flash flood risk dictates go/no-go.
Why It’s Beautiful
A water-world slot canyon: 1,000-ft walls rise from a river you literally hike in. Reflected light paints the sandstone in silver, peach, and fire.
Trail Notes
Your “trail” is the Virgin River—expect slippery cobbles and variable depth. A drysuit or wetsuit may be needed in shoulder seasons; canyoneering boots/neoprene socks improve grip and warmth.
Photo Tips
- Midday can be best because reflected light bounces deeper into the canyon.
- Keep gear dry; consider a waterproof bag and a small towel for lens care.
Pro Tips
- Check the flash-flood forecast day-of.
- Trekking poles are invaluable.
- Turn around before fatigue; the exit slog back downriver is slower than you think.
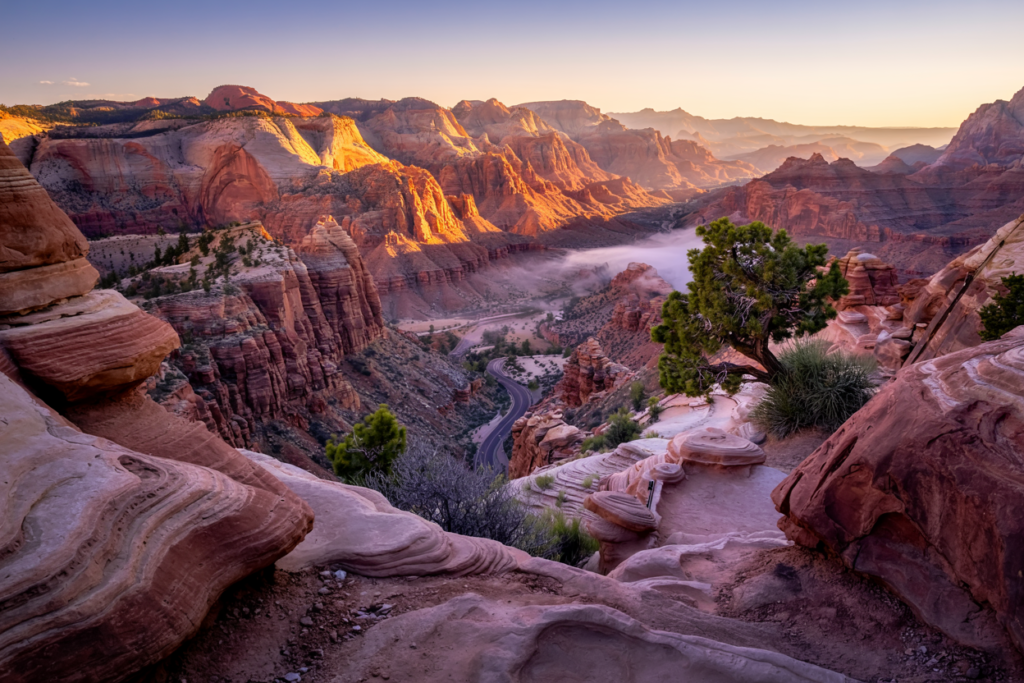
3) Observation Point via East Mesa (Zion National Park)

Trail Snapshot
- Distance: ~6.5–7 miles round-trip (via East Mesa)
- Elevation Gain: ~700–800 ft (via East Mesa; the classic Weeping Rock route has periodic closures—always check)
- Difficulty: Moderate
- Time: 3–4 hours
- Trailhead: East Mesa area (graded roads; conditions vary)
- Permits: None for the day hike, but access/parking can change—verify road status.
Why It’s Beautiful
The best grandstand over Zion Canyon—higher and more expansive than Angels Landing. You get the classic view including Angels Landing below you.
Trail Notes
Rolling forested mesa leads to a dramatic final overlook. The East Mesa approach avoids the steepest grades of the historic route while still delivering the signature panorama.
Photo Tips
- Dawn paints the canyon; late light brings long shadows and drama.
- Panoramas do well here—bring a stable stance on the rim.
Pro Tips
- If road conditions are muddy, have a backup plan.
- Winds can be strong at the rim; pack a layer.
4) Canyon Overlook (Zion National Park)
Trail Snapshot
- Distance: ~1 mile round-trip
- Elevation Gain: ~160 ft
- Difficulty: Easy-moderate (some drop-offs; railings in places)
- Time: 45–90 minutes
- Trailhead: East side of Zion-Mt. Carmel Tunnel (limited parking)
- Permits: Not typically required.
Why It’s Beautiful
A short effort for a massive payoff—an iconic window across slickrock domes and the switchbacking road below. Perfect at sunrise.
Trail Notes
Uneven sandstone steps and ledges with some railings. Popular; go early.
Photo Tips
- Sunrise silhouettes the foreground; blue hour is gorgeous.
- Leading lines: use the canyon’s S-curves and road below.
Pro Tips
- Great family-friendly option with caution around exposure.
- Combine with a drive east through checkerboard mesas.
5) Navajo Loop + Queen’s Garden (Bryce Canyon National Park)
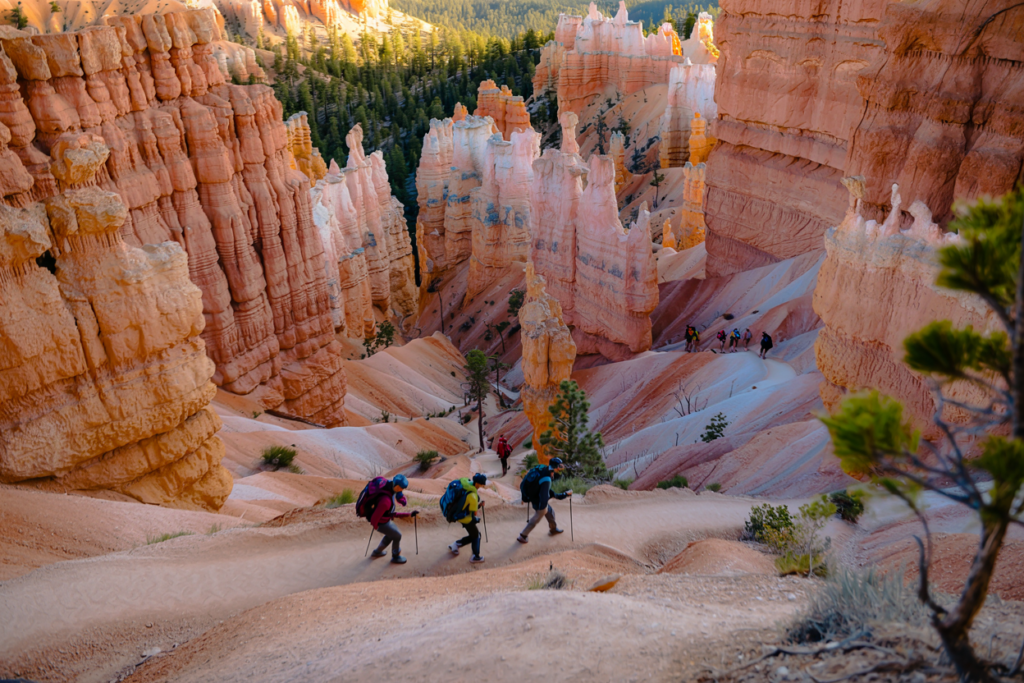
Trail Snapshot
- Distance: ~2.9 miles loop
- Elevation Gain: ~600–650 ft
- Difficulty: Moderate (steep sections)
- Time: 1.5–3 hours
- Trailhead: Sunset or Sunrise Point (Bryce Amphitheater)
- Permits: Park entry; no day-hike permits.
Why It’s Beautiful
Descend among orange sherbet hoodoos—switchbacks through Wall Street, windows, and finned spires that feel otherworldly.
Trail Notes
Best done clockwise from Sunrise Point (Queen’s Garden first) or counterclockwise depending on crowds. Trails can be snowy/icy in winter—microspikes help.
Photo Tips
- Sunrise ignites the hoodoos; after snow, contrast is spectacular.
- Telephoto compresses hoodoo forests into abstract patterns.
Pro Tips
- Bring a wind layer—Bryce sits high (~8,000–9,000 ft).
- Don’t skip the rim viewpoints before/after the loop.
6) Fairyland Loop (Bryce Canyon National Park)

Trail Snapshot
- Distance: ~8 miles loop
- Elevation Gain: ~1,700–2,000 ft
- Difficulty: Moderate-strenuous due to sustained ups/downs at altitude
- Time: 4–6 hours
- Trailhead: Fairyland Point or Sunrise Point
- Permits: Not typically required.
Why It’s Beautiful
A quieter, longer immersion among Bryce’s hoodoos with sweeping amphitheater vistas and fewer crowds than the main loop.
Trail Notes
Rolling terrain, exposed to sun and wind—start early, pack water.
Photo Tips
- Early or late light for shadow texture on hoodoos.
- Look back often—the scenery changes dramatically in reverse.
Pro Tips
- If you’re acclimating to altitude, take it slow.
- Combine with Navajo + Queen’s on a two-hike Bryce day if fit.
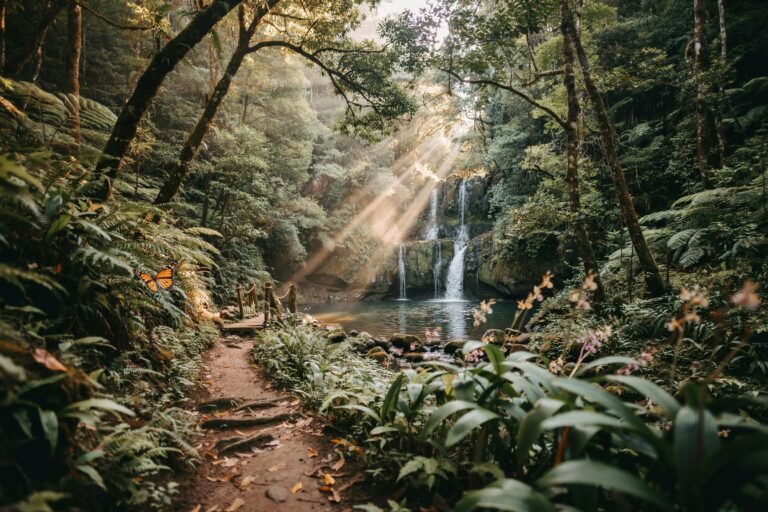
7) Lower Calf Creek Falls (Grand Staircase–Escalante)

Trail Snapshot
- Distance: ~6 miles out-and-back
- Elevation Gain: ~600 ft
- Difficulty: Moderate (sandy stretches, sun exposure)
- Time: 3–4 hours
- Trailhead: Calf Creek Recreation Area, between Escalante and Boulder
- Permits/Fees: Day-use fee; check site-specific details.
Why It’s Beautiful
A vivid green oasis set against varnished sandstone. The 126-ft waterfall drops into a clear pool framed by ferns and cottonwoods—lush by desert standards.
Trail Notes
Undulating path with interpretive stops for petroglyphs and beaver ponds. Sand can slow your pace on hot days.
Photo Tips
- Mid-afternoon can light the falls directly; misty long exposures work well (use an ND filter).
- Watch spray on your lens.
Pro Tips
- Dip your feet, but be mindful of slippery rocks.
- Pack extra water and a sun hat—little shade until the end.
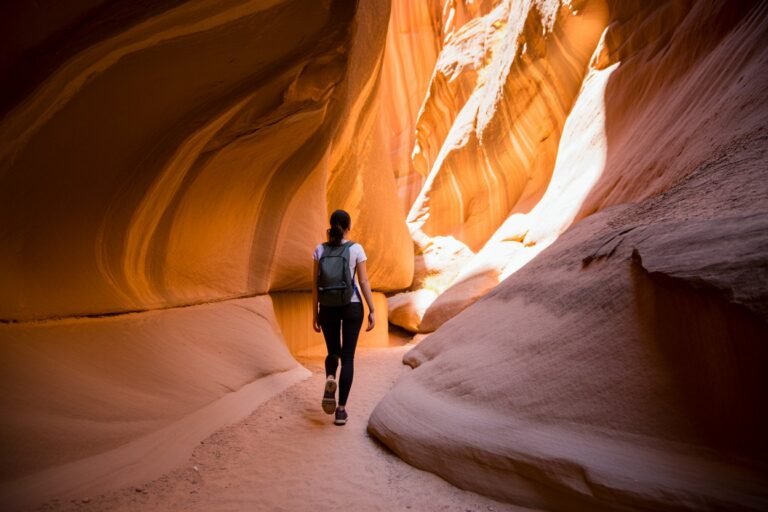
8) Peek-a-Boo & Spooky Gulch (Grand Staircase–Escalante)

Trail Snapshot
- Distance: ~3.5–4.5 miles loop (with approach from Dry Fork trailhead)
- Elevation Gain: ~600–700 ft
- Difficulty: Moderate; tight squeezes, short scrambles, potential route-finding
- Time: 3–4 hours
- Trailhead: Dry Fork (graded road; sandy sections check conditions)
- Permits: Not typically required; weather & flash-flood awareness essential.
Why It’s Beautiful
Two photogenic slot canyons with swirling walls and playful obstacles. Peek-a-Boo’s sculpted windows lead to Spooky’s ultra-narrow corridors.
Trail Notes
Common loop direction: up Peek-a-Boo (short Class 2/3 step-ups), down Spooky (very narrow—pack slim). Bring route notes; cairns mark the approach.
Photo Tips
- Avoid crowds for tripod use; bring a cloth for red dust.
- Reflective light glows orange—shoot RAW for dynamic range.
Pro Tips
- Not recommended for claustrophobia.
- Skip if storms are forecast; flash floods are serious.
9) Delicate Arch (Arches National Park)
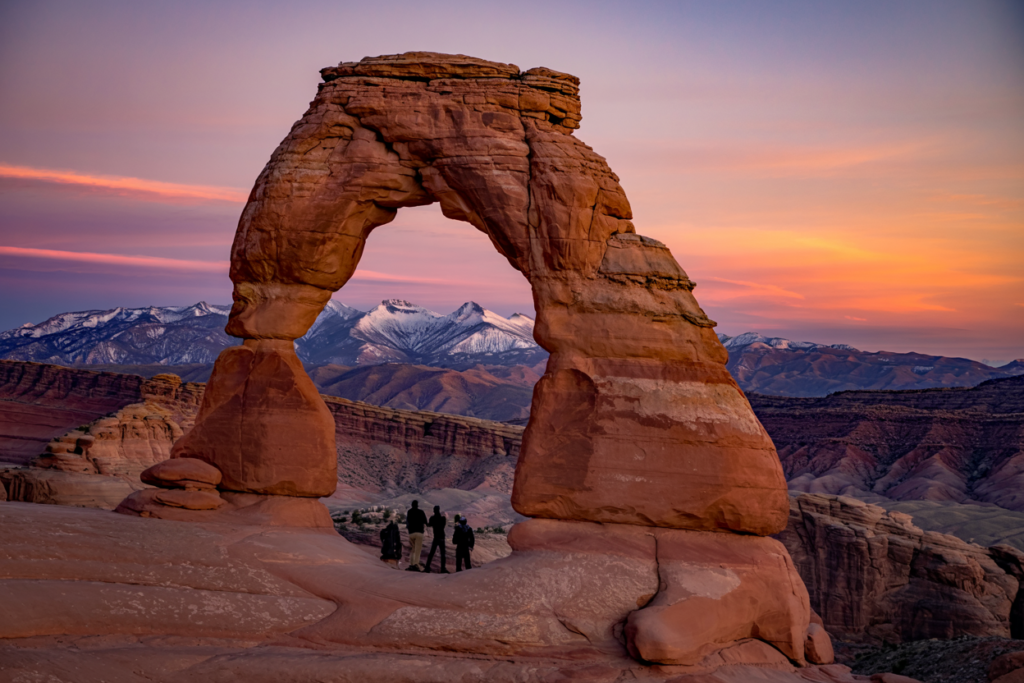
Trail Snapshot
- Distance: ~3 miles out-and-back
- Elevation Gain: ~480 ft
- Difficulty: Moderate (slickrock, exposure to sun/wind)
- Time: 2–3 hours
- Trailhead: Wolfe Ranch / Delicate Arch Trailhead
- Permits: Timed-entry or reservation systems can apply in peak seasons; confirm current rules.
Why It’s Beautiful
Utah’s license-plate icon, perched on a natural sandstone bowl with the La Sal Mountains as a backdrop. At golden hour, the arch glows like it’s lit from within.
Trail Notes
Initial sandy path, then steady up slickrock following cairns. Final ledge near the bowl requires sure footing but is wide enough for most hikers with care.
Photo Tips
- Sunset is classic; arrive early for a good spot.
- Wides and mid-tele both work—include the bowl for context.
Pro Tips
- Bring a headlamp for the hike out after sunset.
- On crowded days, snap during lulls between portrait queues.
10) Devils Garden Loop (Arches National Park)

Trail Snapshot
- Distance: 7.8 miles full loop (shorter options to Landscape Arch, etc.)
- Elevation Gain: ~1,100 ft
- Difficulty: Moderate; some fins and slickrock navigation beyond Landscape Arch
- Time: 3–6 hours
- Trailhead: Devils Garden trailhead (end of the park road)
- Permits: Park entry rules apply; timed entry may affect access.
Why It’s Beautiful
The highest concentration of natural arches in the park with varied terrain: graceful Landscape Arch, double-deck arches, and slickrock fins with big-sky views.
Trail Notes
Well-maintained to Landscape Arch; beyond, expect cairn-to-cairn travel on rock, minor scrambling, and occasional exposure.
Photo Tips
- Early start for Landscape Arch before crowds.
- Overcast can be perfect—soft light on pale sandstone.
Pro Tips
- Carry ample water; summer heat is intense.
- If new to slickrock travel, turn around at Landscape Arch.
11) Corona Arch (Near Moab, BLM)

Trail Snapshot
- Distance: ~3 miles out-and-back
- Elevation Gain: ~500 ft
- Difficulty: Moderate; short cable/ladder assist on slickrock
- Time: 2–3 hours
- Trailhead: Potash Road (UT-279), west of Moab
- Permits: Typically none for day hiking; parking fills on busy days.
Why It’s Beautiful
A massive freestanding arch rivaling the best inside the parks—without the timed-entry pressure. The approach traverses open slickrock with canyon views.
Trail Notes
Well-marked with cairns and painted symbols. One short ladder and a cable-assisted ledge section add fun, not fear, for most hikers.
Photo Tips
- Afternoon light often hits the arch face.
- Stand back with a wide-angle to capture its full span.
Pro Tips
- Combine with petroglyph stops along Potash Road.
- Leashed dogs allowed—check updated rules and heat risk.
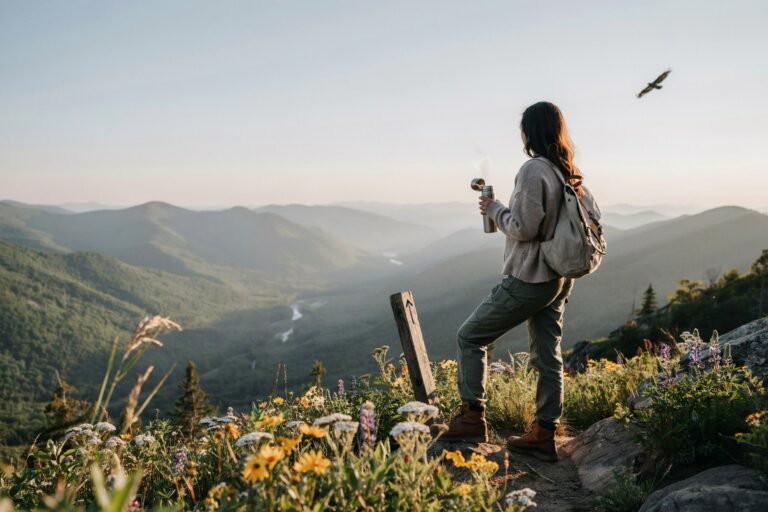
12) Lake Blanche (Wasatch Mountains, Big Cottonwood Canyon)

Trail Snapshot
- Distance: ~6.8 miles out-and-back
- Elevation Gain: ~2,700 ft
- Difficulty: Strenuous (steady uphill at altitude)
- Time: 4–6 hours
- Trailhead: Mill B South trailhead, Big Cottonwood Canyon (near Salt Lake)
- Permits: Canyon-specific rules apply; no dogs in Big Cottonwood (watershed protection).
Why It’s Beautiful
A classic Wasatch alpine hike: a sparkling lake beneath brooding Sundial Peak, with summer wildflowers and blazing fall colors. On the right day, you’ll get mirror reflections.
Trail Notes
Consistent grade on rocky singletrack. Snow lingers into early summer; shoulder seasons are gorgeous. Start early for parking and cooler temps.
Photo Tips
- Sunrise for pastel alpenglow on Sundial Peak.
- Calm mornings yield reflections long exposure optional.
Pro Tips
- Pack layers weather changes quickly in the alpine.
- Bring traction if shoulder-season ice is present.
Planning Your Utah Hiking Trip
How Many Days Do You Need?
- Long weekend (3–4 days): Choose one region—Zion, Bryce, or Moab—and go deep.
- One week: Combine two regions (e.g., Zion + Bryce, or Moab + Escalante).
- 10–14 days: Sample all five national parks with buffer for weather and recovery days.
Where to Base Yourself
- Zion: Springdale (walk/shuttle into the canyon), or East Zion for quicker access to East Mesa/Canyon Overlook.
- Bryce: Bryce Canyon City or Tropic.
- Escalante: Town of Escalante or Boulder for Lower Calf Creek and slot canyons along Hole-in-the-Rock Road (carry extra water; roads can wash out).
- Moab: In town for Arches/Canyonlands and BLM classics like Corona Arch.
- Wasatch: Salt Lake City or nearby towns for Lake Blanche and bigger alpine days.
Driving Times (Rough Guide)
- Las Vegas → Zion: ~2.5–3 hours
- Zion → Bryce: ~2 hours
- Bryce → Escalante: ~1 hour
- Escalante → Moab: ~4 hours (scenic options vary)
- Moab → Salt Lake City: ~3.5–4 hours
Permits, Reservations & Shuttles
- High-demand hikes (e.g., Angels Landing) may require permits/lotteries—check official sites well ahead.
- Timed entry systems may apply at some parks in peak seasons.
- Zion Shuttle: Operates part of the year; plan around shuttle hours for trailheads like The Grotto and Temple of Sinawava.
- Canyons & Slots: Never enter if rain is forecast anywhere in the watershed.
Weather & Safety
- Heat: Desert hikes can exceed 38°C (100°F) in summer—start at dawn, carry more water than you think you need (minimum 3–4L on longer desert hikes), add electrolytes.
- Monsoon (roughly July–September): Afternoon storms; be canyon-smart.
- Altitude: Bryce (~8–9k ft) and Wasatch peaks can tax sea-level visitors—acclimatize and pace yourself.
- Winter: Icy trails and short daylight; pack traction and a headlamp.
What to Pack (Desert & Alpine Essentials)
Footwear: Grippy hiking shoes/boots (approach shoes or canyoneering boots for The Narrows).
Hydration: 2–4L capacity per person (bladder + bottles); electrolytes.
Sun Armor: Wide-brim hat, sunglasses, UPF shirt, sunscreen, lip balm.
Layers: Lightweight wind/rain shell; warm layer for alpine and shoulder seasons.
Navigation: Map/GPS/app + downloaded offline maps; power bank.
Lighting: Headlamp with spare batteries (essential for sunrise/sunset hikes).
First Aid: Blister kit, tape, personal meds.
Extras: Trekking poles, snacks with salt, compact emergency blanket, whistle.
Narrows-specific: Neoprene socks, canyon shoes, dry bag (seasonal).
Shoulder/Winter: Microspikes/traction, gloves, beanie.
Photography & Light
- Blue hour & sunrise highlight cool tones, then warm glow on sandstone.
- Midday in slot canyons can be best due to reflected light.
- Golden hour/sunset dramatize arches and canyon walls.
- Tripod etiquette: Step aside quickly; share popular vantage points.
- Dust & spray management: Microfiber cloths, lens hoods, and protective filters help.
Responsible Hiking in Utah
- Leave No Trace: Pack out all trash, including micro litter.
- Cryptobiotic soil: Fragile “biocrust” is alive—stay on durable surfaces (trail, rock, sand washes).
- Cultural sites: Do not touch petroglyphs/pictographs; oils damage them.
- Wildlife: Keep distance; never feed animals.
- Human waste: Use toilets where provided; otherwise follow local rules (WAG bags where required).
5-Day Sample Utah Hiking Itinerary (First-Timers)
Day 1 – Zion Arrival
- Afternoon stretch: Canyon Overlook (sunset).
- Night in Springdale.
Day 2 – Zion Big Day
- Dawn: Angels Landing (if permitted; otherwise Observation Point via East Mesa).
- Afternoon: Riverside Walk and The Narrows scout; grab rental gear if needed.
- Night in Springdale.
Day 3 – Zion to Bryce
- Early Narrows (bottom-up) to your turnaround.
- Drive to Bryce (2 hrs). Sunset walk along the rim.
- Night near Bryce.
Day 4 – Bryce Immersion
- Sunrise: Navajo + Queen’s Garden Loop.
- Mid-day rest; afternoon Fairyland Loop if energy allows, or scenic overlooks.
- Night near Bryce or drive toward Escalante.
Day 5 – Escalante & Travel Out
- Morning: Lower Calf Creek Falls (or Peek-a-Boo & Spooky if conditions, experience, and timing align).
- Depart toward home base or extend to Moab for Delicate Arch and Devils Garden on Days 6–7.
Have more time? Add Moab (2–3 days) for Delicate Arch, Devils Garden, and Corona Arch. Finish with an alpine day near Salt Lake (Lake Blanche) for a perfect desert-to-mountain contrast.
Trail-by-Trail Deep Dive (Expanded Notes & Tips)
Below, you’ll find additional detail to help you tailor each hike to your group’s abilities and interests, plus specific ways to beat crowds and heat.
Angels Landing – Crowd & Heat Strategy
- Start before first shuttle when possible; be at the trailhead right away.
- Shoulder seasons (late fall, early spring) can be less hot and a bit calmer midweek.
- Turnaround option: Scout Lookout is a worthy goal if the chains feel like too much.
The Narrows – Seasonal Gear Guide
- Summer: Often comfortable in quick-dry layers; footwear with firm soles and a sturdy hiking pole or two.
- Spring/Fall: Neoprene socks and canyoneering shoes; sometimes a farmer-john wetsuit.
- Winter: Drysuit rentals are common; keep hands warm and watch daylight.
Observation Point via East Mesa – Access Reality
- Road conditions vary after rain/snow; sedans sometimes struggle with mud.
- The payoff is fewer crowds and that unbeatable overlook.
Canyon Overlook – Family-Friendly Caveats
- Short drop-offs with rails; keep kids close.
- Limited parking—arrive early morning or late afternoon.
Navajo + Queen’s Garden – Direction Matters
- Clockwise from Sunrise → Queen’s Garden → Navajo via Wall Street (if open) is a favorite flow.
- In winter, icy switchbacks are common—carry traction.
Fairyland Loop – Quiet Beauty
- Exposure and rolling terrain make it feel bigger than the mileage.
- Pack a warm layer—even on sunny days the wind at Bryce can bite.
Lower Calf Creek Falls – Pace & Shade
- Bring a cooling bandana or umbrella for midday sun.
- Interpretive guide adds meaning to petroglyphs and geology.
Peek-a-Boo & Spooky – Slot Savvy
- Check your pack width; narrow passages can require turning sideways.
- If you encounter congestion in Spooky’s tightest section, be patient and cooperative.
Delicate Arch – Sunset Protocol
- Arrive 60–90 minutes before sunset to secure a vantage point.
- After the sun dips, stay for alpenglow—often the best color.
Devils Garden – Choose Your Adventure
- Family option: Landscape Arch (1.6 miles round-trip).
- Full loop: Adds Partition, Navajo, Double O Arch, and primitive loop slickrock.
Corona Arch – Park Alternative
- Great choice when Arches NP timed entry doesn’t suit.
- Heat reflects off slickrock—aim for morning or late afternoon.
Lake Blanche – Alpine Reward
- Consider acclimatization if coming from sea level.
- In October, aspens set the canyon ablaze.
Frequently Asked Questions
Do I need a 4×4 for these hikes?
Not for most trailheads listed here, though some access roads (e.g., East Mesa for Observation Point, Dry Fork for Peek-a-Boo/Spooky) can become rutted, sandy, or muddy.
After storms, even high-clearance vehicles can struggle—check local conditions and never drive into deep mud or flooded washes.
Are permits required?
Policies evolve. High-demand hikes (notably Angels Landing) have used permit systems.
The Narrows (bottom-up) generally hasn’t required a permit for day hikers, while top-down does.
Always confirm current rules on official sites before you finalize plans.
Can I hike in summer?
Yes with very early starts, extra water/electrolytes, sun protection, and realistic goals.
Avoid exposed afternoon slogs in the desert. Consider focusing on sunrise/sunset desert hikes and saving big mileage for the alpine.
What about kids?
Canyon Overlook, Queen’s Garden portions, and Corona Arch can be great for families with caution around drop-offs and heat.
Angels Landing’s chain section and tight slots in Spooky are not appropriate for many children.
Wildlife & bugs?
Desert critters avoid the heat; watch for snakes sunning on trails early or late.
In alpine basins, mosquitoes can appear in early summer—pack repellent.
Cell service?
Spotty. Download offline maps, and don’t rely on your phone for navigation or emergency contact.
Alternates & Add-Ons (If You Want 14–15 Options)
- Mount Timpanogos (Wasatch): Big alpine day with wildflowers, goats, and sweeping views (~14–16 miles RT depending on route; strenuous).
- Little Wild Horse Canyon (near Goblin Valley): Family-friendly slot canyon loop with fun narrows.
- Hidden Canyon (Zion) and Emerald Pools for lower-effort scenic variety when rivers are high or weather is unstable.
Final Pro Tips for an Effortless Utah Hiking Trip
- Anchor your trip around light. Put your most photogenic hikes at sunrise/sunset; fill midday with short slots (if conditions allow), scenic drives, or siestas.
- Carry more water than you think. Electrolytes = fewer cramps, clearer head.
- Respect the desert. Flash floods, cryptobiotic soil, and heat demand humility and planning.
- Be shuttle-savvy in Zion. Knowing the first/last shuttle saves stress.
- Give yourself buffer days. Wind, rain, or crowd dynamics happen—flexibility pays off.
- Leave no trace of your adventure. The magic of Utah depends on it.
Wrap-Up
From the cathedral-like span of Delicate Arch to the wind-polished narrows of Escalante and the high granite bowls of the Wasatch, Utah’s beauty is best experienced on foot.
Use this guide to craft an itinerary that matches your season, fitness, and appetite for adventure. Start early, carry water, respect the land, and let the light do the rest.