
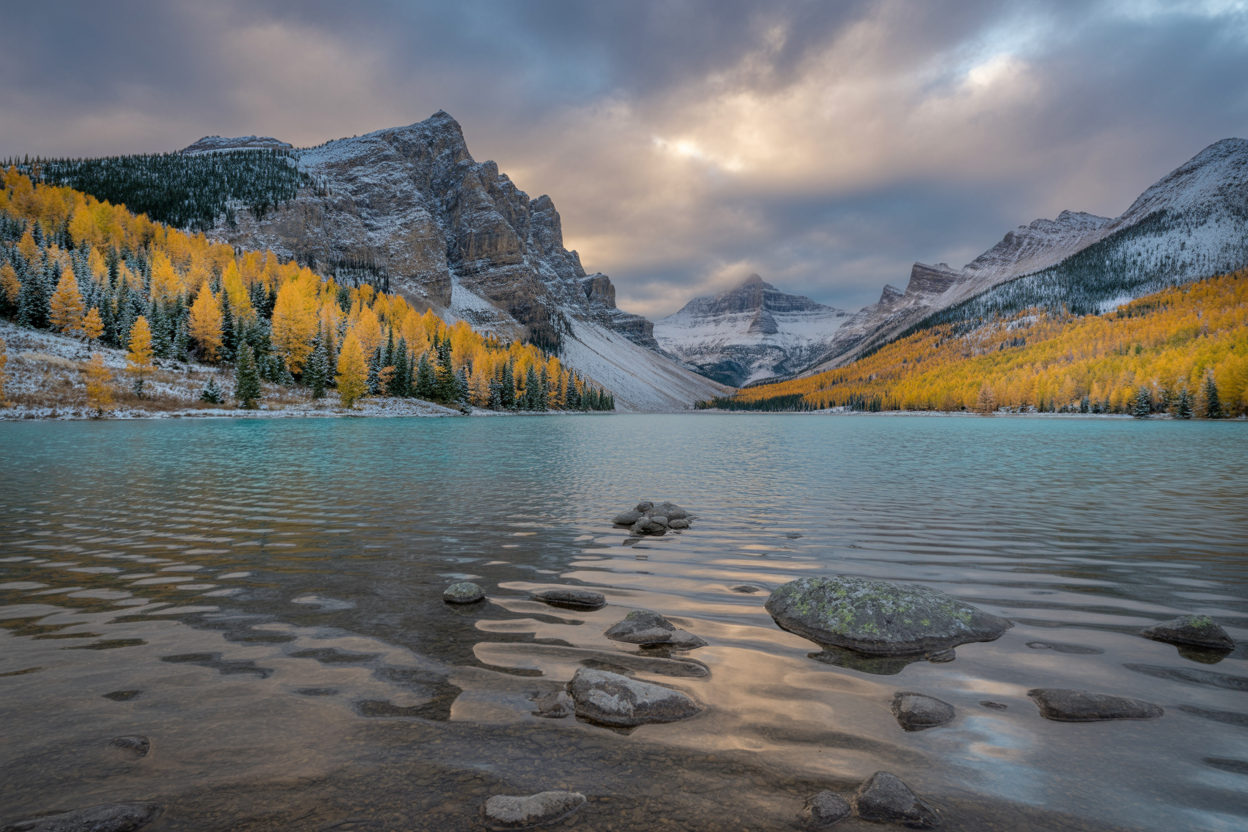
The Canadian Rockies are one of the most spectacular hiking destinations in the world.
Stretching across British Columbia and Alberta, these mountains are home to turquoise lakes, jagged peaks, alpine meadows, glaciers, and wildlife that looks straight out of a National Geographic documentary.

For hikers, this region is heaven: endless trails ranging from gentle lakeside walks to multi-day backcountry treks that challenge even the most experienced adventurers.
In this guide, we’ll walk you through the 11 best hikes in the Canadian Rockies from famous trails like Lake Agnes Tea House and Plain of Six Glaciers to bucket-list hikes like Mount Assiniboine and Skyline Trail.
How to Get There
The Canadian Rockies stretch for over 1,400 kilometers (870 miles), covering major parks like Banff, Jasper, Kootenay, and Yoho National Parks. Most visitors fly into one of two major airports:
- Calgary International Airport (YYC) Best for Banff, Lake Louise, Kootenay, Yoho, and nearby hikes. About 1.5–2 hours from Banff by car.
- Edmonton International Airport (YEG) Best for Jasper and northern Rockies hikes. About 4 hours to Jasper by car.
Transportation options:
- Car rental is the most flexible option — you’ll need it for trailheads spread across the Rockies.
- Shuttle buses are available from Calgary to Banff and Lake Louise, and some private shuttles serve popular trails (Lake O’Hara, Moraine Lake).
- Public transport is limited, so don’t rely on it for trail access.
For most hikes in this guide, assume you’ll need a rental car or private shuttle.
When to Go
The Canadian Rockies hiking season is short but sweet.
- Late June to mid-September is the best window for most hikes. Snow lingers at higher elevations into early July, and early snow can return by late September.
- July and August – Peak season with the most stable weather, but also the busiest. Expect crowds at Banff and Lake Louise.
- September – Cooler, fewer crowds, and stunning golden larch trees at higher elevations.
- October–May – Winter dominates; most trails are snow-covered. Some hikes are possible with snowshoes or spikes, but conditions are very different from summer hiking.
Rule of thumb: if you’re tackling high alpine trails like the Skyline Trail or Mount Assiniboine, aim for mid-July to early September
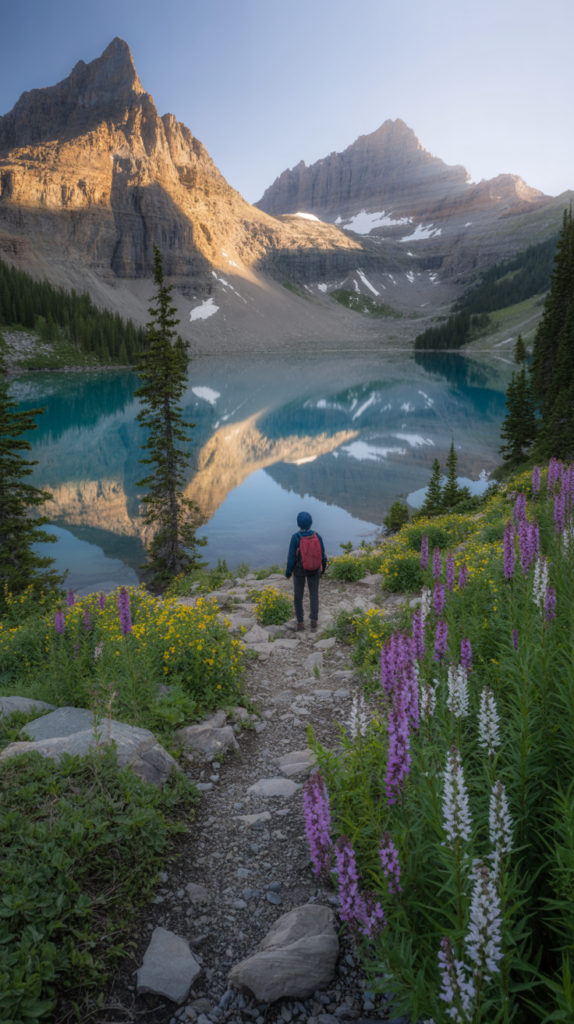
1) Lake Agnes Tea House Hike — Banff National Park
How to get there
Park at the Lake Louise parking area near the Fairmont Chateau Lake Louise.
If the lot is full, take the regular Lake Louise shuttle (seasonal) or park at Lake Louise overflow parking and shuttle in.
The Lake Agnes trailhead starts on the shores of Lake Louise and the well-marked trail climbs through forest to Lake Agnes.
When to go
Mid-June through September is the typical summer hiking season for this trail.
Early July onward is safest for snow-free trail conditions at the tea house; earlier in the season there can be snow and icy patches. Peak crowds: July–August.
Safest hiking path to take
Follow the main signed trail from Lake Louise.
The path is well maintained with switchbacks; stay on trail to avoid fragile alpine vegetation. Be cautious on snow/ice early in the season microspikes and poles help.
Tea house is on the lake’s far shore; follow the bridge markers. (Popular, well-marked trail; no route-finding required.)
Distance & duration
Round trip ~7.4 km (≈4.6 mi). Typical time: 2–3 hours return depending on stops and pace. Elevation gain ~400–435 m (≈1,300–1,430 ft).
Cost breakdown
- Parks Canada daily admission or Discovery Pass required (park fees vary by season).
- If you use the Lake Louise shuttle, account for shuttle fees (seasonal).
- The Lake Agnes Tea House accepts cash for teas and snacks (small cost for refreshments ~CAD 5–15 depending on what you buy).
Essential hiking tips
- Start early (before 8:00 a.m.) to secure parking and avoid crowds.
- Carry cash if you plan to visit the tea house (some seasonal posts may accept cards, but cash is reliable).
- Wear sturdy waterproof hiking boots—trail can be muddy after rain.
- Bring a lightweight layer; the lake sits higher and wind can be chilly.
Tools & lifesaving gear (recommended products)
- Daypack: Osprey Talon 22 (or Osprey Tempest 20 for women).
- Boots: Salomon X Ultra 4 GTX or La Sportiva Nucleo for good traction and waterproofing.
- Poles: Black Diamond Trail Ergo Cork (helps on slippery switchbacks).
- Emergency: lightweight whistle, headlamp, compact first aid kit (Adventure Medical Kits), and small emergency blanket.
- Navigation: smartphone with GPX and offline map + backup paper map (trail is obvious but always good to back up).
Food & water prep
- Bring 1–2 L of water per person (you can refill at park services; water from streams should be filtered).
- Snacks: energy bars, sandwich or pastry if you plan to skip the tea house. If you want tea/food at the tea house, budget CAD 5–15.
Accommodation options
- Fairmont Chateau Lake Louise (luxury) or Lake Louise village lodges and Banff town (~40 min drive). Camping at Lake Louise Campground is another option (reserve early).
Pro tips from experienced hikers
- Combine this hike with Big Beehive or the Plain of Six Glaciers for a longer day.
- If you want photos without crowds, aim for early morning or late afternoon.
2) Plain of Six Glaciers — Lake Louise / Banff National Park
How to get there
Trailhead begins at Lake Louise parking by the Chateau. If parking is full, use the Lake Louise shuttle.
The route follows the lakeshore trail before climbing through the moraine to the Plain of Six Glaciers viewpoint/teahouse.
When to go
Mid-July through early September is ideal for glacier views and minimal snow on the route. Weather can be cold and windy near the glacier; bring layers.
Safest hiking path to take
Stay on the established trail to the teahouse and then to the overlook.
The moraine is rocky use caution and good boots.
Avoid approaching glacier ice (crevasses and unstable edges).
The teahouse is a convenient intermediate stop for rest and refreshments.
Distance & duration
Round trip 11.4–13.8 km (7.1–8.6 mi) depending on whether you stop at the teahouse or continue to the end of the trail.
Typical hike time 3–6 hours round trip; elevation gain ~365–600 m depending on endpoints.
Cost breakdown
- Park admission / Discovery pass.
- Optional shuttle for parking.
- Snacks at Plain of Six Glaciers Teahouse (small fee).
Essential hiking tips
- Carry a warm wind layer — glacier vicinity is cold.
- Footing is rocky; gaiters help if there’s scree.
- If doing sunrise/sunset views, bring a headlamp for approach/return.
Tools & lifesaving gear
- Sturdy hiking boots: La Sportiva Nucleo High II GTX or Salomon Quest 4 GTX.
- Midday sun/rain layering: Arc’teryx Beta LT shell.
- Navigation: offline map app + compass.
- Emergency: small first aid kit, whistle, lightweight bivy for unexpected delays.
Food & water prep
- 2 L water per person for the day; filter (Sawyer Squeeze) if you plan to treat stream water.
- Lunch and trail snacks; teahouse food available but basic—pack a good lunch if you want more energy.
Accommodation
- Lake Louise village lodging or Banff hotels. Backcountry camping requires permit if heading further into the wilderness.
Pro tips
- Consider the teahouse stop for rest—many hikers turn back there, making good turnaround points if time is limited.
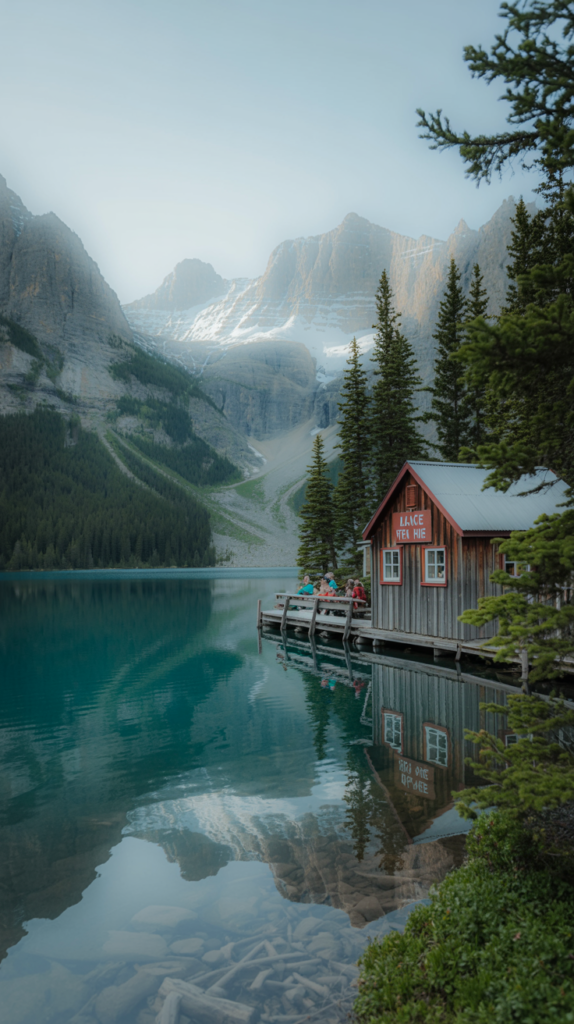
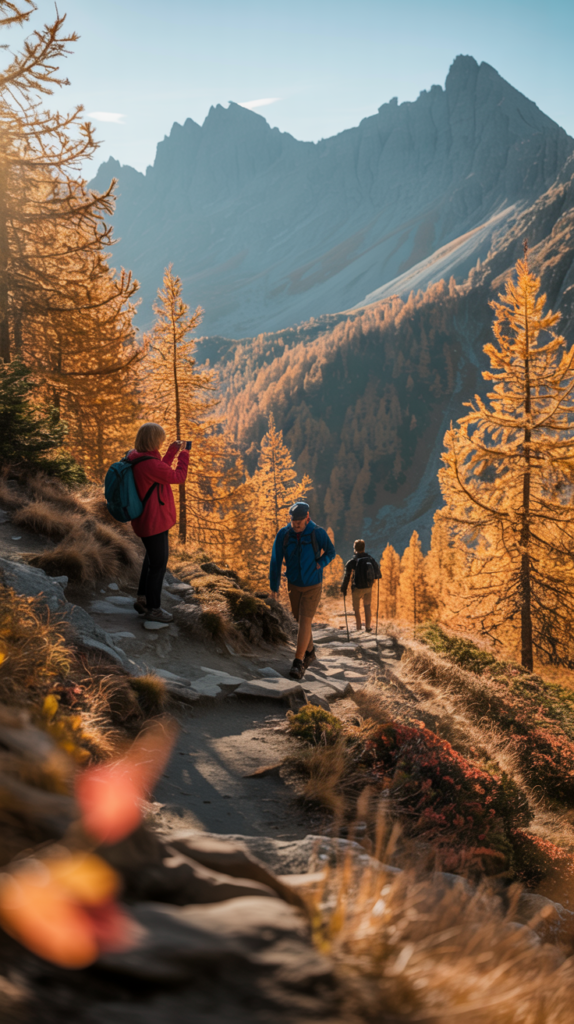
3) Larch Valley & Sentinel Pass — Moraine Lake / Banff National Park
How to get there
Access starts at the Moraine Lake parking/gondola area.
In most summers vehicles are restricted use the Moraine Lake shuttle or parking reservation system (seasonal).
Trailhead begins at Moraine Lake’s Valley of the Ten Peaks area and climbs into Larch Valley and onwards to Sentinel Pass.
When to go
Peak larch season is mid-September (exact peak shifts year-to-year). If you’re chasing larches, plan trips with a flexible window mid-Sept. For general alpine conditions, mid-July to early September is the safe summer range.
Parks Canada lists Sentinel Pass timings; larch color peaks in Sept.
Safest hiking path to take
Follow the well-marked path from the Moraine Lake area into Larch Valley.
The route becomes steep on the approach to Sentinel Pass use poles and take breaks.
Weather can change rapidly on the pass; start early and be prepared to turn back if cloud or storms roll in. In fall, be bear-aware and carry bear spray.
Distance & duration
Round trip ~11–12 km (≈6.8–7.5 mi) to Sentinel Pass depending on start/end points; expected time 4–6 hours. Elevation gain roughly 700–800 m (2,300–2,600 ft).
Cost breakdown
- Parks Canada admission; shuttle/reservation fees for Moraine Lake access (seasonal).
- No permits required for day hiking on this route (but reservation systems limit vehicle access).
Essential hiking tips
- Book Moraine Lake shuttle or parking in advance (it fills early).
- Wear layers, have rain shell, and bring bear spray (multiple bear sightings are possible in the area).
- Footing can be loose—watch for scree near the pass.
Tools & lifesaving gear
- Bear spray: Counter Assault 360 g (carry on body, not in pack).
- Poles: Black Diamond Trail Ergo Cork.
- Boots: Salomon Quest 4 GTX.
- GPS: smartphone + offline map; consider Garmin inReach Mini 2 for remote safety and messaging.
Food & water prep
- 2–3 L per person recommended (alpine exertion at elevation). High-calorie snacks: nuts, energy bars, sandwich.
Accommodation
- Moraine Lake Lodge (seasonal, book very early), Lake Louise or Banff town. ﹙Camping in nearby campgrounds with reservations.)
Pro tips
- For photos, the golden larches in September are the main draw—aim for weekday mornings to avoid bus crowds.
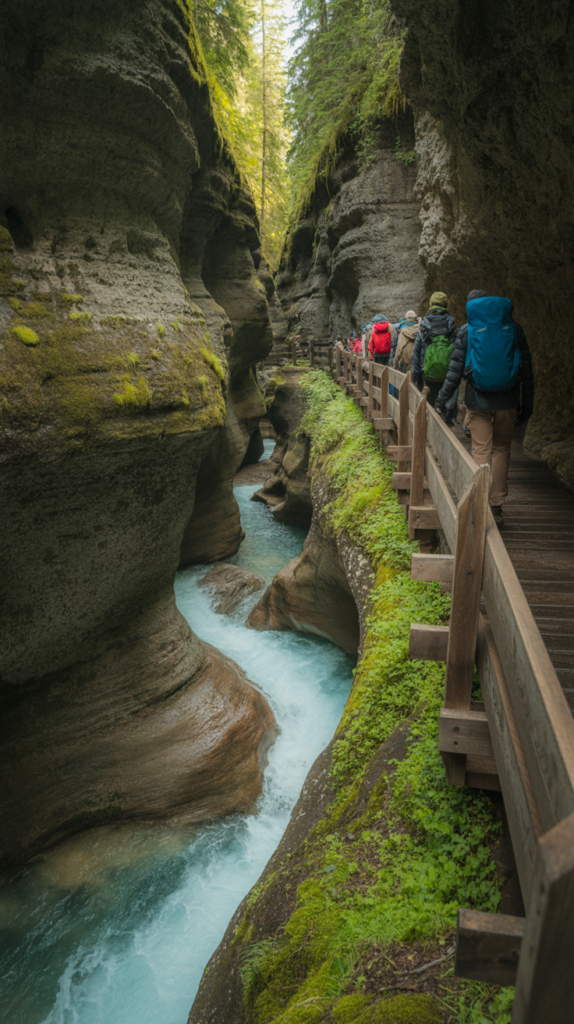
4) Johnston Canyon to the Ink Pots — Banff National Park
How to get there
Drive to Johnston Canyon Day-use Area (short drive from Banff). Large parking lot arrive early in summer.
The trail follows the canyon on a series of maintained boardwalks before opening onto a more open trail to the Ink Pots (mineral springs).
When to go
June through October for easiest conditions; winter offers an ice-walk option but requires traction devices. Daylight and traffic in summer can make middle of day busy aim for early morning.
Safest hiking path to take
Use the maintained boardwalks through the canyon and follow the signs to the Ink Pots.
Boardwalks can be slippery when wet good tread on boots and poles recommended. Stay on boardwalks to protect fragile canyon slopes.
Distance & duration
Round trip distance to the Ink Pots is ~11.7–12 km (≈7.3 mi) depending on exact routes; typical 4–5 hours return.
Parks Canada lists one-way to the Ink Pots as about 5.7 km from the trailhead (4-hr round trip estimate).
Cost breakdown
- Parks Canada park entry/Discovery Pass. No special permits required for day access
Essential hiking tips
- Boardwalks are narrow and can be slick—watch footwear.
- The canyon section attracts families; if you want solitude continue past the canyon to the Ink Pots.
Tools & lifesaving gear
- Footwear: Keen Targhee III or similar with stable soles.
- Poles for balance.
- Small first aid kit and a headlamp if you’ll be returning late.
Food & water prep
- 1.5–2 L water and midday snacks. Several short viewpoints along the canyon make good micro-break points.
Accommodation
- Banff town or nearby campgrounds. Johnston Canyon is easily done as a half-day trip from Banff.
Pro tips
- Walk beyond the main waterfall boardwalks to reach quieter trails and the Ink Pots fewer crowds and more alpine meadows.
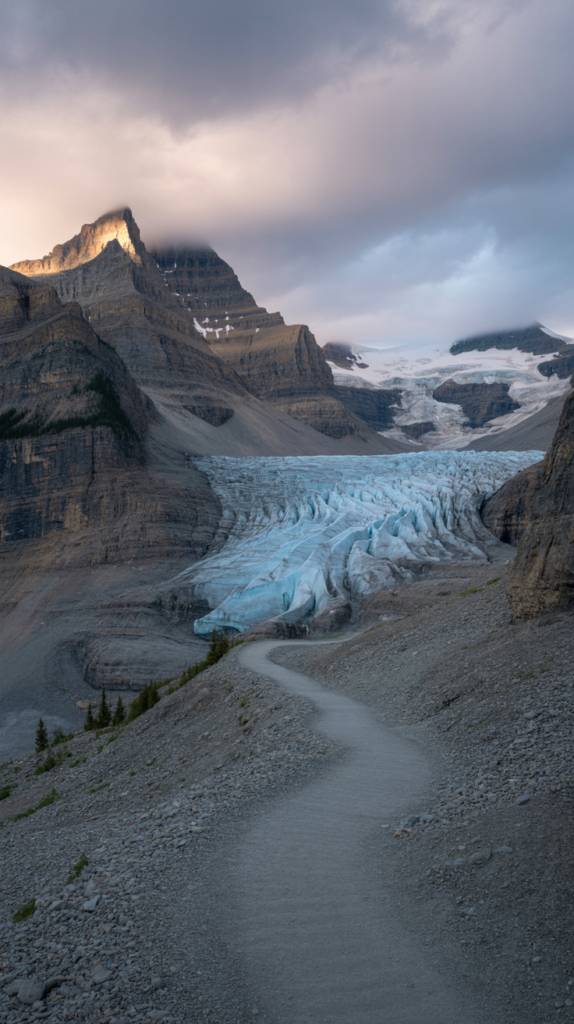
5) Parker Ridge Trail — Icefields Parkway / Jasper National Park
How to get there
Parker Ridge trailhead is located along the Icefields Parkway (Hwy 93) a short drive north of Saskatchewan River Crossing and south of the Columbia Icefield area.
There is a small parking area; arrive early during peak season.
When to go
July–September is the window for snow-free access and good views of Saskatchewan Glacier.
The ridge is exposed; avoid high wind or storm days.
Safest hiking path to take
Trail is well maintained and short but steep; stay on the defined path up to the ridge.
Watch for wind exposure on the ridge; turn back if conditions deteriorate.
Distance & duration
Round trip ~5.1–5.4 km (≈3.2 mi); typical time 2–3 hours; elevation gain ~250–270 m (≈820–900 ft).
Cost breakdown
- Park entry fee (Parks Canada). No backcountry permit required for this day hike.
Essential hiking tips
- Camera ready—this short hike yields a dramatic glacier viewpoint.
- Wind can be severe—bring a windproof shell.
Tools & lifesaving gear
- Light daypack (Osprey Talon 22).
- Windproof jacket (e.g., Patagonia Houdini or Arc’teryx Beta LT).
- Good hiking shoes with ankle support.
Food & water prep
- 1.5–2 L water and a snack—this is a short hike but exposure and wind increase exertion.
Accommodation
- Overnight in Jasper or along Icefields Parkway lodging. Many hikers combine this trail with other short Icefields Parkway stops.
Pro tips
- Combine Parker Ridge with nearby short stops (Bow Lake viewpoint, Peyto Lake) for a full day along the Icefields Parkway.
6) Skyline Trail — Jasper National Park (multi-day classic)

How to get there
Trailhead: Maligne Lake area (south end) or Maligne Canyon/other access points.
Most hikers start at Maligne Lake and hike north along the Skyline ridge toward Signal or Cynic campgrounds (one popular route is Maligne Lake → Skyline → Edyth/Signal).
Backcountry route planning requires booking campsites and backcountry permits with Parks Canada well in advance.
When to go
Mid-July through early September is the reliable summer window. Passes and high ridgelines may be snow-covered into July; avoid early season attempts
Safest hiking path to take
This is an exposed alpine ridge for long stretches stay on the trail, respect weather warnings, and carry emergency communication (satellite), extra layers, and be ready to bail if storms approach.
Book campsites in designated backcountry locations only; do not camp outside permitted sites.
Distance & duration
Length ~44 km (≈27 mi) one way or as a point-to-point; commonly done in 2–3 days though strong hikers may do it in 1–2 long days.
Expect high elevation and ridge walking, with about 1,400 m (≈4,600 ft) total elevation change across the route
Cost breakdown
- Parks Canada backcountry permit required (per night fees and campsite booking).
- Transportation: arrange shuttle or plan logistics for point-to-point exit/return.
Essential hiking tips
- Book campsites months ahead (Skyline is very popular).
- Carry bear hang/food storage systems and practice proper backcountry food security.
- Bring mountain weather clothing and extra food for delays.
Tools & lifesaving gear
- Backpack: Osprey Atmos AG 65 (men) / Osprey Aura AG 65 (women).
- Tent: MSR Hubba Hubba NX 2 (light, durable).
- Stove: Jetboil Flash or equivalent.
- Navigation/communication: Garmin inReach Mini 2 for SOS and messaging.
- Bear deterrence: bear hang kit and small bear canister where required.
Food & water prep
- Plan 3–4 L water per day from reliable alpine sources with filtration (Sawyer Squeeze or Katadyn BeFree). Treat/boil or filter water.
- High-calorie food: dehydrated meals, nuts, bars, jerky, instant oatmeal, electrolyte powders.
Accommodation
- Backcountry campsites on the Skyline (book via Parks Canada). For nearby base towns: Jasper.
Pro tips
- The ridge walking above treeline yields some of the best sunrise/sunset alpine scenery in the Rockies—plan camp stops to maximize ridge views. Book early; summer fills quickly.
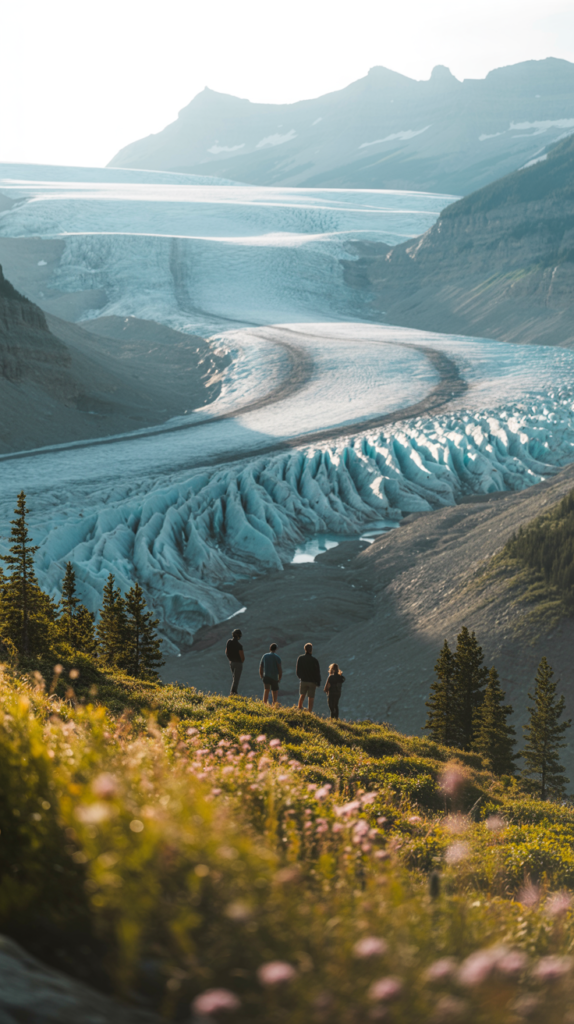
7) Wilcox Pass — Columbia Icefield / Banff National Park
How to get there
Wilcox Pass trailhead is a short drive from the Icefields Centre on the Icefields Parkway (Hwy 93).
A small lot leads to a short climb up to the Wilcox viewpoint and, if desired, a longer out-and-back route to the pass itself.
When to go
July–September for stable access. Higher elevation may retain snow into July.
Safest hiking path to take
The trail is well marked; the viewpoint loop is short and safe. If you go to the full pass, stay on the main path as the terrain becomes more alpine and exposed.
Distance & duration
Short viewpoint return: ~2.4 km (≈1.5 mi) to first viewpoint; full pass ~8 km return (2–3 hours depending on endpoint). Elevation gain can be ~390 m to the pass viewpoint.
Cost breakdown
- Parks Canada entry fees. No backcountry permit for the day hike viewpoint.
Essential hiking tips
- Great option if you want glacier/icefield views with less distance. Pack a windproof layer and sun protection.
Tools & lifesaving gear
- Sturdy boots and a wind jacket.
- Camera and binoculars for glacier viewing.
Food & water prep
- 1.5–2 L water and snacks for the short hike.
Accommodation
- Stay at Icefields Centre accommodations, or base in Lake Louise/Jasper depending on travel plan.
Pro tips
- Red Parks Canada chairs at viewpoint make a great photo stop—arrive mid/late afternoon for better light on the icefield.
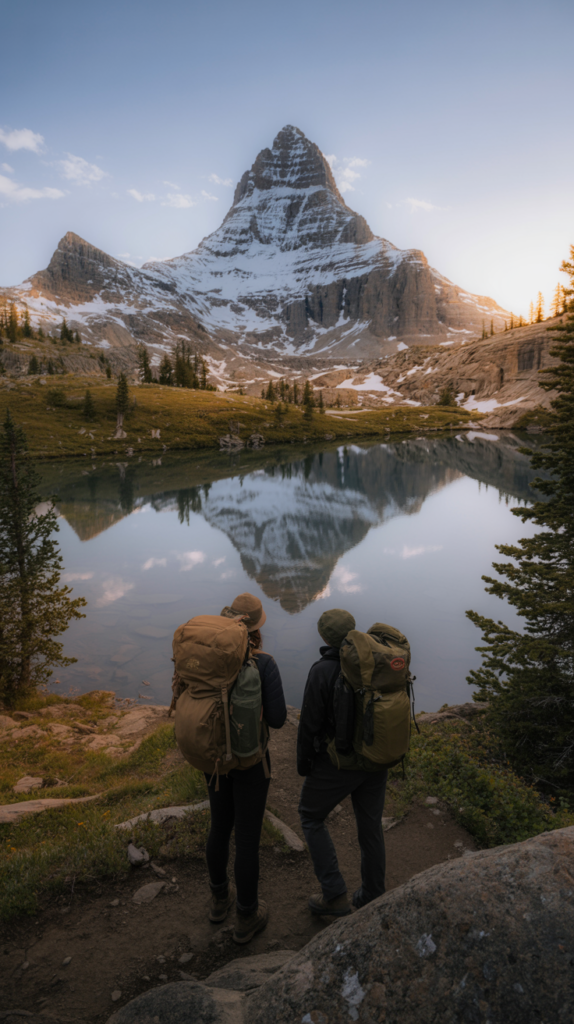
8) Mount Assiniboine via Sunshine Village route (multi-day trek)
How to get there
Common access is from Sunshine Village (Banff area) via the Sunshine parking/gondola area and then by foot or shuttle toward the Bourgeau parking/approach.
Alternatively, hikers approach from Mount Shark / Sunshine Meadows routes.
Helicopter or horse options exist for different logistics; the hike is a true multi-day backcountry endeavor.
When to go
July through September; high passes may hold snow earlier in the season.
Multi-day planning needs reliable summer weather—avoid shoulder months for remote camping.
Safest hiking path to take
Follow the established trail from Sunshine/Bourgeau access points.
This trek gains significant mileage and elevation; navigate by map and use designated backcountry campsites.
If you lack multi-day experience, consider guided trips or the gondola/shuttle plus cabin stay options.
Distance & duration
Approaches vary widely: expect 30–55+ km (≈18–34 mi) round-trip depending on route and side trips. Typical duration: 3–6 days depending on pace and itinerary.
Cost breakdown
- Parks Canada backcountry permits per night.
- Optional: Sunshine gondola fees if using mechanized access; helicopter drop/ride costs are extra.
Essential hiking tips
- Plan food and fuel for multiple nights and pack for rapidly changing alpine weather.
- Use bear-safe food storage and pack the Ten Essentials.
- Reserve campsites/permits early.
Tools & lifesaving gear
- Backpack: Osprey Atmos/Aura AG 65.
- Tent: MSR Hubba Hubba NX 2.
- Stove: Jetboil.
- Satellite messenger: Garmin inReach Mini 2 for remote communication.
- Bear canister or approved hang system.
Food & water prep
- 3–4 L/day water planning; bring stove fuel for melting/treating water if needed. High-calorie freeze-dried meals and calorie-dense snacks recommended.
Accommodation
- Backcountry campsites or the Mount Assiniboine Lodge (if you want a hut/cabin experience; book far ahead).
Pro tips
- If time is short, consider the helicopter shuttle from Mount Shark to Assiniboine Lodge (subject to availability and weather). The full hike is a remote classic—respect minimal impact practices.
9) Lake O’Hara Alpine Circuit — Yoho National Park
How to get there
Access is controlled: Parks Canada operates a shuttle bus to Lake O’Hara from the parking area (reservations required; entry is limited and often via random-draw reservation system for day use).
During the season book the shuttle/permit well in advance. Once at Lake O’Hara, a network of trails (Lake Oesa, Alpine Circuit) are accessible.
When to go
Mid-June to early October is the window for shuttle and access; most hikers visit July–September for snow-free conditions.
Reservations open in spring and must be secured early.
Safest hiking path to take
Stick to the well-marked Lake O’Hara trails; plan day loops or overnight camping with permits.
The alpine trails can be steep and exposed carry appropriate layers and navigation aids.
Respect shuttle and access rules to protect the fragile environment.
Distance & duration
Typical Lake O’Hara Alpine Circuit loops range from short 6–12 km day loops to multi-day backpacking circuits depending on itinerary; plan 3–6 hours for popular day loops (Lake Oesa and Alpine Circuit variations).
Cost breakdown
- Parks Canada shuttle reservation fee (seasonal); park entry fee.
- Backcountry camping requires permits if staying overnight.
Essential hiking tips
- Book shuttle randomly drawn reservations early—this is essential.
- Treat the area as fragile—stay on trail and follow Parks Canada gu
Tools & lifesaving gear
- Lightweight pack, good boots, poles, and a small first aid kit. If camping, full backcountry kit and bear-safe storage required. Recommended GPS or offline trail.
Food & water prep
- Day hikers: 2 L water and snacks; overnight: 3–4 L/day planning + fuel for cooking. ﹙Limited facilities at Lake O’Hara.)﹚
Accommodation
- Lake O’Hara Campground (permit) or day-use with shuttle. No hotels at the lake—nearest lodging: Field, BC or Lake Louise.
Pro tips
- If you secure a shuttle reservation, plan at least one overnight to maximize the remote alpine experience—Lake O’Hara is one of the Rockies’ quietest, most pristine areas.
10) Crypt Lake Trail — Waterton Lakes National Park

How to get there
Begin at Waterton townsite.
Access to the trailhead is typically via the Waterton Shoreline boat shuttle (seasonal ferry) that lands at the Crypt Lake trailhead; check the ferry schedule and book boat tickets in advance.
The trail includes a tunnel, ladder sections, and exposed cliffside portions.
When to go
Mid-June to September is the usual hiking window.
The boat schedule runs seasonally; check Waterton visitor information for exact dates.
Safest hiking path to take
The trail is maintained and well marked but includes narrow cliff paths, a metal ladder, and a short tunnel—those with fear of heights should assess carefully.
Follow posted signs and do not attempt the route in poor weather. Book the boat return times and be punctual.
Distance & duration
Round trip ~17–20 km (≈10.5–12.4 mi) depending on ferry logistics; expected time 5–8 hours including ferry transfer and trail. Elevation gain ~700–900 m (~2,300–3,000 ft) depending on measurement.
Cost breakdown
- Boat shuttle fees (seasonal, small fee per adult/child).
- Parks Canada park admission.
Essential hiking tips
- Reserve the ferry in advance—space is limited.
- Make sure you have daylight for the full return; the trail is remote once you’re committed.
- Tunnel and ladder sections require steady footing—good shoes and no loose packs on ladder climbs.
Tools & lifesaving gear
- Boots: solid, grippy laced boots (e.g., Salomon X Ultra series).
- Gloves for tunnel/ladder sections can provide extra grip.
- Small first aid kit and headlamp (in case of delays).
Food & water prep
- 3 L water recommended for exertion and sun exposure; dense lunch and snacks for a long day.
Accommodation
- Waterton townsite lodging or camping. Plan an overnight in Waterton if using the ferry in the morning.
Pro tips
- Book a guided hike if you’re uncomfortable with technical sections or want interpretive insights from local guides.
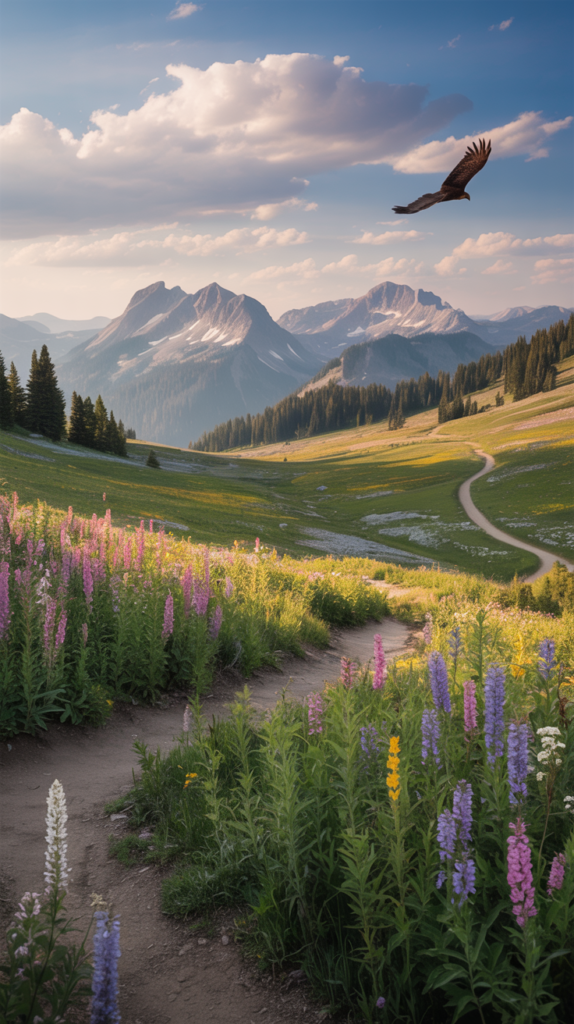
11) Sunshine Meadows (Sunshine Village) — Banff National Park
How to get there
Take the Sunshine Village gondola in summer from the Sunshine Village base; the gondola lifts you into high alpine meadows (gondola runs seasonally for hiking/wildflower season).
There are also hiking approaches from the parking area if you prefer to hike up (longer, steeper).
When to go
June through early September for the gondola and wildflower displays—peak wildflower season generally in July and early August. (Check Sunshine Village gondola operating dates.)
Safest hiking path to take
Gondola access makes the trails gentler and family friendly.
Follow marked loop trails through meadows; if hiking up from the parking lot expect steep sections—use poles and take breaks. Carry bear spray in the parking and meadow areas.
Distance & duration
Trail loops from 5–15 km (≈3–9 mi) depending on the chosen loop; time ranges from 1–5+ hours. Gondola access reduces elevation gain and effort.
Cost breakdown
- Gondola ride fee (seasonal ticket).
- Park admission fees.
Essential hiking tips
- Check gondola times—last gondola down is often by early evening; plan to avoid being stranded.
- Dress for alpine sun and wind.
Tools & lifesaving gear
- Light daypack, sun protection, wind shell, and bear spray.
- Good hiking shoes or light boots.
Food & water prep
- 1.5–2 L water and snacks for a half/ full day; picnic options available at the top in high season.
Accommodation
- Banff town or Sunshine Mountain Lodge for overnight above treeline (book early).
Pro tips
- Ideal for families, photographers, and those chasing wildflowers—July and early August offer the best displays. Catch sunrise/sunset for excellent color in the meadows.
Final essentials (applies to all hikes in this post)
Bear safety — Carry bear spray and know how to use it.
Travel in groups when possible; make noise in dense forest or low‐visibility areas.
Store food properly in campsites and backcountry areas. (Parks Canada bear safety guidance).
Navigation & communication — For day hikes, carry an offline map on your phone plus a paper map backup.
For multi-day/backcountry routes (Skyline, Assiniboine, Lake O’Hara backcountry), bring a satellite messenger (Garmin inReach) or SPOT device; cell coverage is unreliable.
Packing essentials — Always bring the Ten Essentials: navigation, headlamp, sun protection, insulation layer, rain shell, first-aid kit, fire starter, repair kit, extra food, and extra water/treatment.
Add bear spray and a charged satellite device for remote routes.
Permits & access : Many of these hikes are day-use only or require Parks Canada passes; Lake O’Hara and some backcountry sites require advance reservation.
Check Parks Canada pages and local shuttle reservation systems before travel.


